🔁 How to Transfer USDT from Binance to MetaMask (2025 Step-by-Step Guide)
By Jason Miller – Crypto Writer 10.expert 🧠 Covering Bitcoin, altcoins, blockchain & Web3.
Need to move your USDT from Binance to MetaMask? Whether you’re investing, trading on DeFi, or securing your stablecoins, transferring USDT is fast and easy — as long as you use the right network.
Let’s break it down. 👇
🧠 1. What Is USDT?
USDT (Tether) is a stablecoin pegged to the US dollar. It exists on multiple blockchains, like:
- Ethereum (ERC20)
- BNB Smart Chain (BEP20)
- Tron (TRC20)
- Arbitrum, Polygon, and others
📌 The network you choose must match MetaMask’s support.
🦊 2. Can MetaMask Hold USDT?
Yes — MetaMask can hold USDT on Ethereum (ERC20), BNB Smart Chain (BEP20), Polygon, and others.
But MetaMask can’t receive TRC20 (from Tron), so don’t use that!
⚠️ 3. Choose the Right Network
When withdrawing from Binance to MetaMask, always choose:
- ERC20 for Ethereum
- BEP20 for BNB Smart Chain
- Polygon (if your MetaMask is set up for it)
❌ Don’t use TRC20 or Solana — MetaMask won’t recognize it.
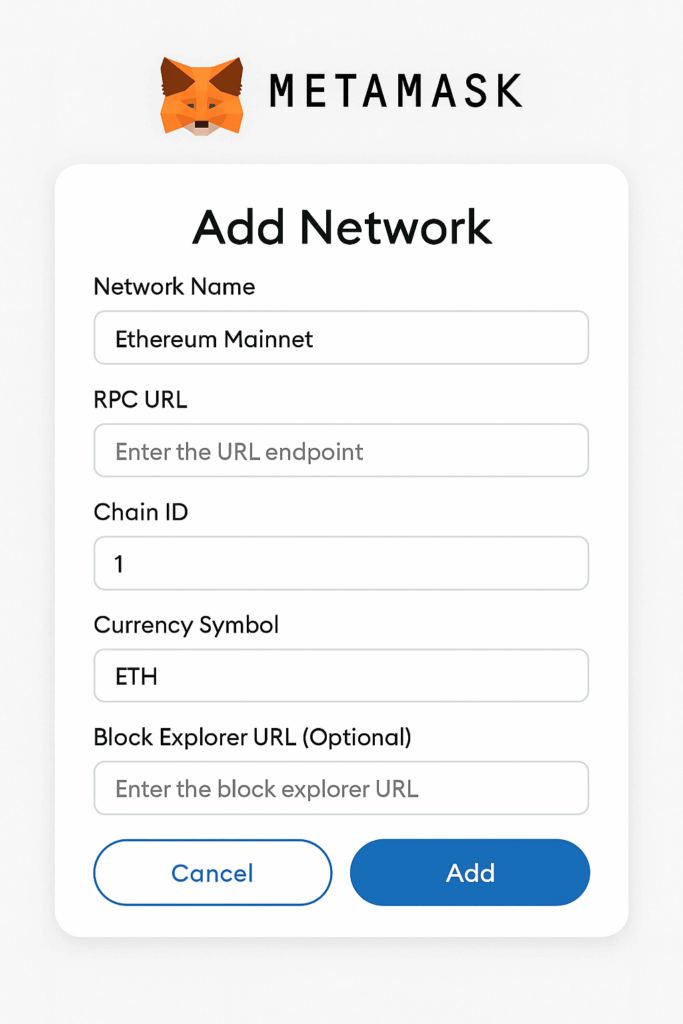
🛠 4. Add the Network to MetaMask (If Needed)
To add BEP20 or Polygon:
- Open MetaMask → Settings → Networks → Add Network
- Enter chain info (from official docs)
- Save → Network is now enabled
🧾 5. Add USDT Token to MetaMask
If you don’t see USDT in your wallet:
- Click “Import Tokens”
- Paste the correct USDT contract address for that network
- Confirm → USDT is now visible
💼 6. Copy Your MetaMask Address
From MetaMask:
- Select the correct network (e.g., BNB Chain)
- Tap your wallet address to copy it
It usually starts with 0x...
📲 7. Open Binance App or Website
Log in to your Binance account.
- Go to Wallet → Spot
- Find USDT
- Tap Withdraw
🔗 8. Paste the MetaMask Address
In the “Recipient Address” field, paste your MetaMask address from step 6.
Double-check for accuracy.
🌐 9. Choose the Network
Very important:
- For MetaMask on Ethereum → Choose ERC20
- For MetaMask on BNB Chain → Choose BEP20
- For MetaMask on Polygon → Choose Polygon
⚠️ Wrong network = funds lost!
💰 10. Enter the Amount of USDT
Input how much USDT you want to transfer. Binance will show:
- Network fee
- Total amount to be received
🧠 11. Confirm and Verify
Click Withdraw, then:
- Complete 2FA (SMS/email)
- Approve via email or Authenticator app
⏱ 12. Wait for Blockchain Confirmations
USDT transfers usually take:
- ERC20: ~5–10 mins
- BEP20 / Polygon: ~1–3 mins
📥 13. Check Your MetaMask
Within minutes, USDT will appear in your wallet (if token is imported). You can track it using Etherscan, BscScan, or Polygonscan.
📦 14. What to Do If It Doesn’t Arrive
If the transaction is confirmed on blockchain but not showing:
- Make sure token is added
- Refresh MetaMask
- Re-import the token
- Check you used the correct network
🔒 15. Tips for Safe Transfers
- Always start with a small test amount
- Never copy wallet addresses from untrusted sources
- Bookmark MetaMask to avoid phishing
- Store seed phrase offline
✅ Final Thoughts
Transferring USDT from Binance to MetaMask is straightforward — just double-check the network. Once in MetaMask, you’re free to explore DeFi, staking, or simply hold securely.
)
&description=&image=https://10.expert/wp-content/uploads/2025/06/How-to-Transfer-USDT-from-Binance-to-MetaMask-2025-Step-by-Step-Guide.png)