How to Add a Token to MetaMask
By Jason Miller – Crypto Writer 10.expert 🧠 Covering Bitcoin, altcoins, blockchain & Web3.
As a crypto writer and analyst, one of the most common questions I get about using decentralized applications (dApps) and managing altcoins revolves around MetaMask. You’ve sent funds to your MetaMask wallet, but they’re not showing up! Don’t panic – it’s a very common scenario. MetaMask doesn’t automatically display every single token you own. Instead, it typically shows a few popular ones by default, and for the rest, you need to “add” them to make them visible in your wallet interface.
This doesn’t mean your funds are lost; they are safely on the blockchain, associated with your wallet address. Adding the token simply tells MetaMask to display that specific asset. This process is crucial for managing your DeFi portfolio, especially after participating in token sales, receiving airdrops, or swapping less common altcoins on DEXs like Uniswap.
In 2025, MetaMask continues to refine its token detection, but knowing how to manually add a token remains a fundamental skill for any crypto user.
Let’s walk through how to add a token to MetaMask.
How to Add a Token to MetaMask: See All Your Digital Assets Clearly 🦊✨
Your crypto funds are safe on the blockchain, even if MetaMask isn’t showing them. Here’s how to make those hidden tokens visible in your wallet.
Understand Why Tokens Might Not Show Automatically 🤔
- Not All Tokens Are Pre-Loaded: MetaMask comes with a list of common tokens (like ETH, USDC, USDT on Ethereum Mainnet). However, there are hundreds of thousands of other tokens.
- Network-Specific: Tokens exist on specific blockchain networks (e.g., Ethereum, Polygon, BNB Smart Chain, Arbitrum). If your MetaMask is on the wrong network, you won’t see tokens from another network.
- New/Niche Tokens: Newly launched tokens, meme coins, or very niche tokens are unlikely to be auto-detected immediately.
Ensure You’re on the Correct Network 🌐
This is the most common reason for tokens not showing up.
- Network Selector: In your MetaMask extension (or mobile app), look at the top center. It will display the currently selected network (e.g., “Ethereum Mainnet,” “Polygon Mainnet”).
- Switch Networks: If your token is on a different network, click the network dropdown and select the correct one. If you haven’t added the network yet, you’ll need to do so first (e.g., manually adding RPC details or using Chainlist.org).
Locate the Token’s Contract Address 🔍
This is the most critical piece of information you need.
- Block Explorers:
- Etherscan.io (for Ethereum ERC-20 tokens)
- Polygonscan.com (for Polygon tokens)
- Bscscan.com (for BNB Smart Chain tokens)
- Arbiscan.io (for Arbitrum tokens)
- Search for the token by its name or symbol. The contract address will be prominently displayed on its token page. Always verify you’re on the correct network’s explorer.
- Coin Listing Sites: Websites like CoinGecko.com or CoinMarketCap.com list contract addresses for various tokens on different networks. Look for the “Contract” section on the token’s page. Often, they have a small MetaMask fox icon you can click to directly add the token (see Headline 15).
- Official Project Websites/Documentation: For new or less common tokens, the project’s official website or whitepaper should provide the contract address. Be extremely cautious of unofficial sources, as fake token addresses are a common scam!
Open Your MetaMask Wallet 🦊
- Browser Extension: Click the MetaMask fox icon in your browser toolbar.
- Mobile App: Open the MetaMask app on your smartphone.
- “Assets” Tab: Ensure you’re on the “Assets” (or “Tokens”) tab in your MetaMask wallet view.
- Scroll Down: Scroll to the very bottom of your asset list.
- Click “Import tokens”: You’ll find a button or link with this text.
Choose the “Custom token” Tab 📝
- After clicking “Import tokens,” you’ll usually see two tabs: “Search” and “Custom token.” Select “Custom token.”
Enter the Token Contract Address 📋
- Paste Address: Paste the token’s contract address (that you copied in step 3) into the “Token Contract Address” field.
- Auto-Fill: MetaMask is smart! If you’ve pasted a valid contract address for the currently selected network, the “Token Symbol” (e.g., UNI, SHIB, LINK) and “Token Decimal” fields should automatically populate.
Verify Token Symbol and Decimals (If Not Auto-Filled) ✔️
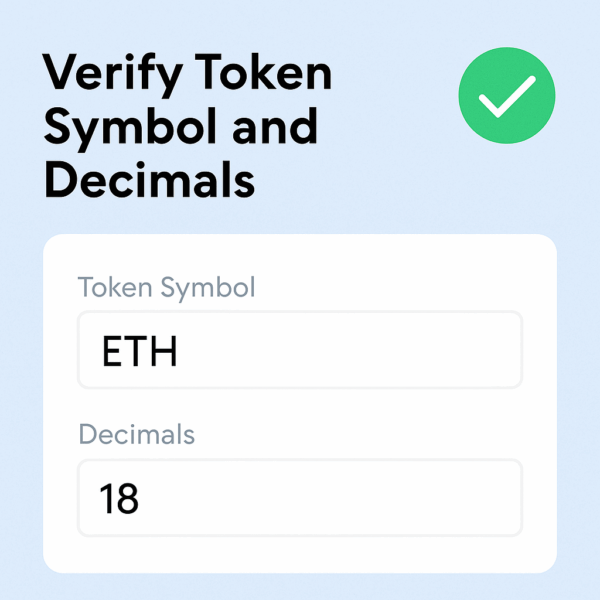
- Double-Check: If the symbol and decimals don’t auto-fill, or you want to be extra cautious, compare them against the information on the block explorer or coin listing site.
- Token Symbol: This is the ticker (e.g., USDT, LINK, UNI).
- Token Decimals: This indicates how many decimal places the token uses (e.g., 6 for USDC, 18 for most ERC-20 tokens). Getting this wrong won’t lose your tokens, but they will display incorrectly (e.g., 1 USDC might show as 1,000,000).
Click “Add Custom Token” ➡️
- Once all fields are correctly populated, click this button.
Confirm “Import Tokens” ✅
- MetaMask will show you a confirmation screen with the token details.
- Click “Import Tokens” to finalize the process.
View Your Newly Added Token 👀
- Go back to your “Assets” tab in MetaMask. Your newly added token, along with its balance, should now be visible in your list!
Leverage MetaMask’s Automatic Token Detection (Where Available) 🤖
- MetaMask continuously improves its token detection for popular tokens. Sometimes, simply transacting with a token (receiving it) or opening your wallet might trigger it to appear automatically, especially on popular networks.
- Check Settings: In MetaMask settings, under “Experimental” or “Advanced,” you might find an “Enhanced token detection” toggle. Ensure it’s enabled for supported networks.
Adding Tokens Directly from Block Explorers (Convenience Feature) 🔗
- Many block explorers (like Etherscan) now have a small MetaMask fox icon next to the token contract address. Clicking this icon will directly prompt MetaMask to add the token, simplifying the process.
Adding Tokens from Coin Listing Sites (Convenience Feature) 🦊
- Similarly, CoinGecko and CoinMarketCap often have a MetaMask icon next to the contract address on a token’s page. Click it, and MetaMask will open asking for confirmation to add the token.
Security Reminder: Verify Everything! ⚠️
- Scam Tokens: Scammers create fake tokens with similar names or symbols to trick users. Always use the contract address from a reliable source.
- Phishing: Only add tokens through your own MetaMask interface or trusted external sites. Never click suspicious links in emails or messages that claim to add tokens for you.
- If in Doubt, Don’t Approve: If a website or prompt seems suspicious, do not approve any transactions or add any tokens. Research thoroughly first.
By following these steps, you’ll ensure that all your valuable crypto assets are visible and manageable within your MetaMask wallet, giving you a clear overview of your portfolio.
